Raspberry pi zero 2Wを入手したので備忘録として書きます。
天気予報API
下記のURLで提供している情報を取得してお天気をLCDへ表示したいと思います。
天気予報 API(livedoor 天気互換) (tsukumijima.net)
お天気の情報は、JSONデータで取得でき、例えば「神奈川県(横浜)」の場合は、cityコード(地域ID)が「140010」なので下記のURLから取得できます。
https://weather.tsukumijima.net/api/forecast/city/140010
お天気情報の取得プログラム
下記は、先ほどのJSONデータから今日のお天気と今の時間の降水確率を取り出すプログラムです。
ファイル名:weather_get.py
#----weather_get-----

def weather_get():
    import requests
    import re
    from datetime import datetime

    #global cor,weather,weather_url
    city_code = "140010" # kanagawa(yokohama) のcityコード
    url = "https://weather.tsukumijima.net/api/forecast/city/" + city_code
    try:
        response = requests.get(url)
        response.raise_for_status()     # ステータスコード200番台以外は例外とする
    except requests.exceptions.RequestException as e:
        print("Error:{}".format(e))

    else:
        weather_json = response.json()
    #    print(weather_json['forecasts'][0]['telop']) # 0:今日 1:明日 2:明後日
        print(weather_json['forecasts'][0]['chanceOfRain']) # 0:今日 1:明日 2:明後日
        weather = weather_json['forecasts'][0]['telop']
        weather_code = weather_json['forecasts'][0]['image']['title']
        weather_url = weather_json['forecasts'][0]['image']['url']

        #file download
        import urllib.request
    #    url2 = "https://www.jma.go.jp/bosai/forecast/img/313.svg"
        url2 = weather_url
        urllib.request.urlretrieve(url2,'./icon/temp.svg')
        urllib.request.urlretrieve(url2,'./icon/'+weather_url[-7:])

     #--------------------------------------------
     #-- ICON change ----
        #svg -> pgn

        import sys
        import os
        os.environ['LC_CTYPE'] = "ja_JP.UTF-8"
        import cairosvg
        from PIL import Image

        svg = "./icon/temp.svg"
        png = "./icon/temp.png"
        cairosvg.svg2png(url=svg, write_to=png)
        img = Image.open(png)
    #    img.save('.icon/temp.png')
    #    print('Deleting temporary png file.')
    #    os.unlink(png)

        # 現在の時間の降水確率を取得していく
        now_hour = datetime.now().hour
        if 0 <= now_hour and now_hour < 6:
            cor = weather_json['forecasts'][0]['chanceOfRain']['T00_06']
        elif 6 <= now_hour and now_hour < 12:
            cor = weather_json['forecasts'][0]['chanceOfRain']['T06_12']
        elif 12 <= now_hour and now_hour < 18:
            cor = weather_json['forecasts'][0]['chanceOfRain']['T12_18']
        else:
            cor = weather_json['forecasts'][0]['chanceOfRain']['T18_24']

        print("現在の降水確率 {}".format(cor))
        print("today is  {}".format(weather))

    return cor,weather,weather_url
#--------------------------------------------------------------
if __name__ == '__main__':

    # libフォルダのライブラリを参照できるようにする。
    import sys
    sys.path.append('./lib')
    from weather_get import weather_get

    weather_get()
今日のお天気の情報
今日のお天気情報は「0」番目にあります。「1」番目は明日、「2」番目は明後日の情報になります。
「0」番目のみ取り出したのが下記になります。
"forecasts": [
{
"date": "2024-03-30",
"dateLabel": "今日",
"telop": "晴のち曇",
"detail": {
"weather": "晴れ 夜 くもり",
"wind": "南西の風 海上 では 南西の風 やや強く",
"wave": "2メートル"
},
"temperature": {
"min": {
"celsius": null,
"fahrenheit": null
},
"max": {
"celsius": null,
"fahrenheit": null
}
},
"chanceOfRain": {
"T00_06": "--%",
"T06_12": "--%",
"T12_18": "--%",
"T18_24": "0%"
},
"image": {
"title": "晴のち曇",
"url": "https://www.jma.go.jp/bosai/forecast/img/110.svg",
"width": 80,
"height": 60
}
},
お天気
先ほどのプログラムでは、赤文字部分("晴のち曇")を weaterという変数へ格納しています。
降水確率
降水確率は、現在の時間から「T00_06」~「T18_24」を判定して、該当する時間の降水確率をcorという変数へ格納しています。例えば18:30の場合は「0%」(青文字の部分)です。
お天気アイコンの取得
お天気のアイコン(緑文字の部分)は、このプログラムがあるフォルダの下にiconフォルダに格納します。あらかじめiconフォルダを作成しておいてください。
お天気アイコンの変換
PythonのライブラリCairoSVGで、SVGファイルからPNGファイルへ変換します。
CairoSVGは、SVGファイルをPDF、EPS、PS、PNGファイルに変換することができます。
CairoSVGを使用するには、pipを使用してインストールする必要があります。
以下のコマンドを使用して、CairoSVGをインストールできます。
$ pip install CairoSVG
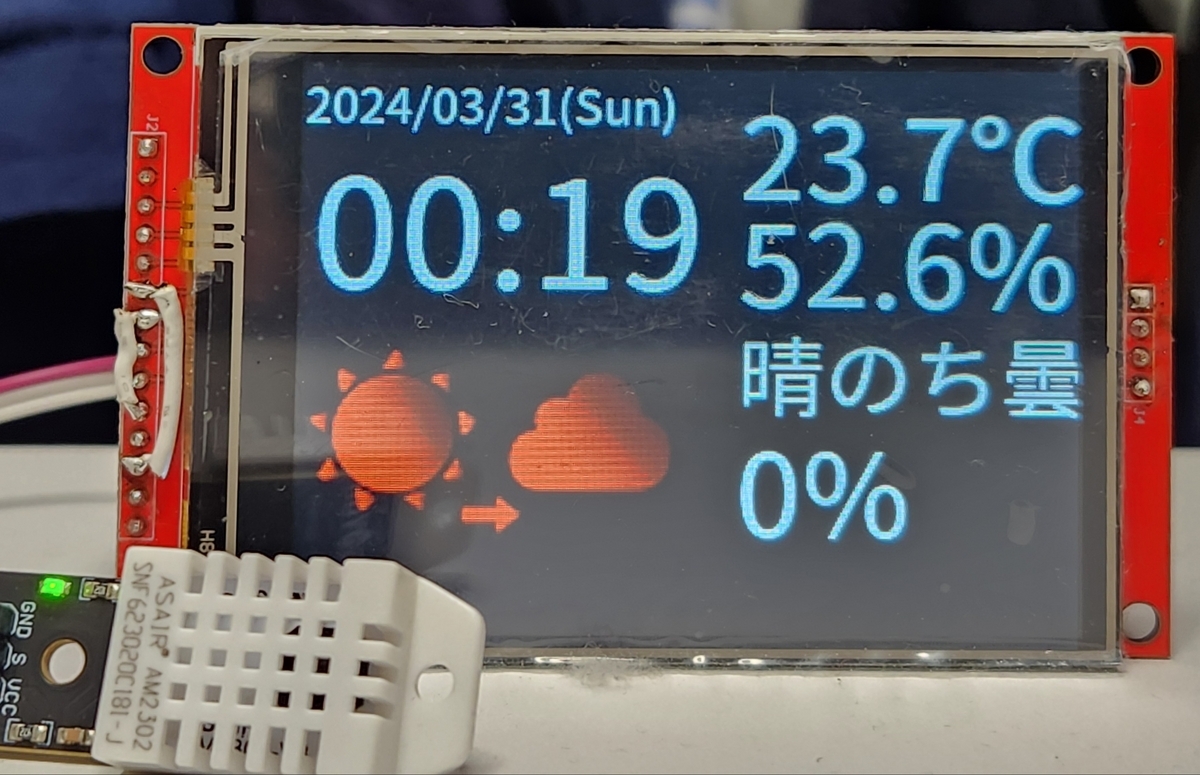
プログラムの実行結果

LCDへのお天気の表示
下図のお天気の表示エリア(黄色の部分)に表示したいと思います。

LCD表示プログラム
下記のプログラムを以前作成したLCD_disp.pyへ追加します。
def weather_disp(cor,weather,weather_url):
    from PIL import Image

    #weather info
    #cor,weather,weather_url = weather_get()

    #天気アイコンの色を決定する
    weather_n = weather_url[-7:]
    weather_n = int(weather_n[0:3])

    icon_color = (0,0,255)
    if weather_n >= 100 and weather_n < 200 : icon_color = COLOR_RED
    if weather_n >= 200 and weather_n < 300 : icon_color = COLOR_GRAY
    if weather_n >= 300 and weather_n < 400 : icon_color = COLOR_LIGTH_BLUE

    # テキストを消去
    draw.rectangle((0,104,319,209), fill=COLOR_BLACK)
    draw.text((180,104), weather, font=FONT_NOTO_36, fill=COLOR_WHITE)
    draw.text((180,144), cor,     font=FONT_NOTO_48, fill=COLOR_WHITE)

    # Open image
    png = "./icon/temp.png"
    icon_image = Image.open(png)

    # Resize to screen size
    size = (160,120)
    icon_image = icon_image.resize(size, resample=Image.LANCZOS)

    # アイコンを表示
    draw.bitmap((0,96), icon_image, fill=icon_color)
    # Display image
    disp.image(image)
アイコン表示の関数「draw.bitmap」は、単色表示だったので、アイコンの種類によって色を指定するようにしました。
(アイコン名が1xx.pngは:赤、2xx.pngはグレー、3xx.pngはブルー)
メインプログラム
前回の温度表示のメインプログラムに赤文字部分を追加しました。
if __name__ == '__main__':

    # libフォルダのライブラリを参照できるようにする。
    import sys
    sys.path.append('./lib')
    from LCD_led import LCD_led
    from LCD_disp import LCD_set,setup_disp,time_disp,now_daytime
    from LCD_disp import temp_disp,weather_disp
    from weather_get import weather_get
    import time

    #---DHT22温度センサの初期設定-----
    import Adafruit_DHT
    sensor = Adafruit_DHT.DHT22
    pin = 26
    #------------------

    LCD_set()     #LCDの初期設定
    LCD_led(23,1) #LCDのLED点灯
    setup_disp()  #起動中表示
    time.sleep(1) #1秒wait

    #今の日時を取得
    today_n,time_n,now_M_S,now_S = now_daytime()
    #時計表示
    time_disp(today_n,time_n)
    #温度取得
    humi, temp = Adafruit_DHT.read_retry(sensor, pin)
    if humi is not None and temp is not None:
        #温度表示
        temp_disp(temp,humi)
    else:
        print('Failed to get reading. Try again!')

    #お天気を取得
    cor,weather,weather_url = weather_get()
    #お天気をLCDへ表示
    weather_disp(cor,weather,weather_url)

    now_S_old = "--"

    while True:
        #今の日時を取得
        today_n,time_n,now_M_S,now_S = now_daytime()

        if now_S != now_S_old: #1秒に1回処理するためにこの処理を追加
            #0秒になったら時計表示
            if now_S == "00" :
                time_disp(today_n,time_n)
                print(today_n,time_n)

            if now_S[1] == "0": #10秒毎に処理
                #温度取得
                humi, temp = Adafruit_DHT.read_retry(sensor, pin)

                if humi is not None and temp is not None:
                    print('Temp={0:0.1f}*C  Humidity={1:0.1f}%'.format(temp, humi))
                    #温度表示
                    temp_disp(temp,humi)
                else:
                    print('Failed to get reading. Try again!')

            if now_M_S == "00:00" :
                #お天気を取得
                cor,weather,weather_url = weather_get()
                #お天気をLCDへ表示
                weather_disp(cor,weather,weather_url)

        now_S_old = now_S #1秒の切り替わりを判定するために前の秒数を保存
起動時と1時間ごとにお天気を取得してLCDへ表示するようにしました。
実行結果